Pages

Dec 30, 2010

...a sparkling toast!

...to all my dear reader ~

This New Year's eve
I will raise a glass of sparkles
and toast
all of YOU!!


Thank You for enriching my life this year.

For taking the time to visit
and to leave your heartfelt comments...

I would have never thought
that words of encouragement and support could help me spread my wings farther!
or dreamed a year ago I would have felt such a bond with others that are just like me,
without ever laying an eye on you!


Truly~
here,
 in this blogging world,
I feel that we are all just creative souls
encouraging each other, supporting one another
and there is room for all who chose to enter!
 

I wish all of YOU
the most love & joy your hearts can hold,
and genuinely wishing each and everyone of you
the 
Happiest New Year!!

~

sharing this last post of the year with Debra's


here's to 2010!!

Dec 28, 2010

...white hot love

...hello dear readers!

I hope your Christmas celebrations were most lovely!


~ for this weeks White Wednesday post,
I thought about sharing a glimpse of our happy family weekend!
It truely was all sooo very joyous,
from the sugar cookie baking day,
to the candle light service night,
and of course
opening those "dirty stockings"
LOL!!
  
but instead,
my heart lead me in another direction...
I wish to share this very special gift that I 
was given m-a-n-y years ago from my most wise, beloved mother...

it is something that attached to my heart
from the moment I read it,
and has inspired me to live my life with this mantra:
Good is NOW!!!
and that there is absolutely
 NOTHING
on God's green earth that means more than this kind of LOVE!
unconditional
white hot
love!! 


It is my gift to you today,
may this little story find favor in your hearts...

~

“Gold Wrapping Paper”
 
  
The story goes
 that some time ago a mother punished her five year old daughter for wasting a roll of expensive gold wrapping paper. Money was tight and she became even more upset when the child used the gold paper to decorate a box to put under the Christmas tree.

Nevertheless, the little girl brought the gift box to her mother the next morning and then said,
“This is for you, Momma.”

The mother was embarrassed by her earlier over reaction,
but her anger flared again when she opened the box and found it was empty.
She spoke to her daughter in a harsh manner.

“Don't you know, young lady, when you give someone a present there's supposed to be something inside the package?”

She had tears in her eyes and said,
 “Oh, Momma, it's not empty!
 I blew kisses into it until it was full.”

The mother was crushed.
She fell on her knees and put her arms around her little girl, and she begged her forgiveness for her thoughtless anger.

An accident took the life of the child only a short time later,
and it is told that the mother kept that gold box by her bed for all the years of her life.

Whenever she was discouraged or faced difficult problems she would open the box and take out an imaginary kiss and remember the love of the child who had put it there.

In a very real sense,
each of us, as human beings,
have been given a Golden box filled with unconditional love and kisses from our children, family, friends. There is no more precious possession anyone could ever ask for.
 
 
I continue to seek...
 and give
 this kind of love!!

~
Sharing this very special gift over at Kathleen's
~ White Wednesday ~


here's to gifts that simply can not be bought!

Dec 21, 2010

...my christmas wish

...hello sugarplums!!

All the decorations are up
and sprinkles of magic
~
are sprinkled!!
 

so I'd just like to take this little breath...


to wish all of my dear readers
  

a time filled with grace...
  

~ a melodious heart ~


~ ethereal beauty ~ 


~ true wonderment ~


~ authentic joy ~
  

~ inner peace ~


and much LOVE!!!
  

This is my Christmas wish for you,
straight from my heart
~ to yours!!

~

This is my last post until after Christmas
so that I may share a few precious moments with my loves!
so I will be sharing this for Kathleen's White Wednesday


See you next week my friends!


here's to a Merriest Christmas!!

Dec 16, 2010

...my tube sock stockings!!

...hello my little gumdrops!!

I feel it only fair to warn you ~

I am feeling a little ornery today:)
I blame it on the holiday punch!!

you see,

I've
been
a
very
d
i
r
t
y
girl...

HA!!!


yep!
I just couldn't help myself...

do you think Santa will maybe let this one thing slide??

It all started in that $ tree
when I was picking up MORE "holy candles"
(((big hit I tell ya'!)))
and went downhill from there!!
  

I shoulda' left those darn tube socks on the rack...
but NOOOoooooo!!
I saw potential in them,
I think I heard them whispering:
"aahhhh, come on Rosemary,
just ONE more project isn't going to kill ya'!"
~ so home they came with me!!
  

I knew that these humble tubes of cheap cotton
could be spun into
oh-so-lovely stockings
with a few supplies I always have on hand!!
  

first, the lace got sewn on all random like,
as everyday elegance is what I am after:)
Then,
(this is the dirty part!)
I grunged em' up real good!!
paper tags,
 handmade cotton roses,
torn strips of cotton for ribbon,
snowflakes ~
nothing was safe
and all went in for a dip!

When it came time to embellish them a bit further
(I know, but it's in my contract, I'm part crow!!)
I sprayed some silver glitter all over them
...
eeewwwwwwhh ~ purrrrrtttttyyyy!!
but
NOT enough!

So I added a happy jingle bell fleur to the toe


nice!

but the "girl" stockings said
"yah, NO!"
"you're sooo going to have to do better than that!!"

humph!

can you imagine?
dirty girl stockings talking to me like that?!!
so...


I gave them a little extra bling:)
they must have liked it,
 as for the rest of the day
the only thing I heard outta' them was the words to "Santa Baby!!"
LOL!!


I put a white sparkle initial on each of the stockings tags
so "Santa" Baby" 
ie. ~ hubby o' mine
would know whose was whose
as he is the stocking filler upper:) 
((this alone is h-y-s-t-e-r-i-c-a-l! and something I have come to really look forward too!!))
each stocking dangles from a hand stamped ribbon that simply says
Find beauty in all things


well, I think that I can check this off my list!
for today anyway!!

~ sharing this over at:
Freckled Laundry's:  ~ Air your laundry Friday ~
My Romantic Home's: ~ Show and tell Friday ~
Come see all the inspiring things that are going on!!


here's to cheap, dirty ~ tube socks!!!

Dec 14, 2010

...o come, let us adore Him!

...hello my sweet friends!
~
Today's post is entitled:

 
do you remember me speaking of making these
using this cookie mold??


well
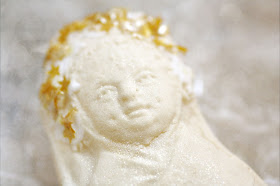
here is the end result  ~


I wish you could see these with your own eyes ~
as you cannot capture their true beauty!
  

I dusted them all with gold powder
that shimmers ever so slightly!
and gave them each a crown of stars...
and let me tell you,
that they smell 

~ heavenly ~

This is the top of my cookie box...


I spray painted over a piece of lace
and then added the pearl letters to spell out
"O come, Let us adore Him"
  

here they are
all nestled within!!


I also made a few linen bags
to tuck a few of these very special cookies into...


I really like how they turned out:)


I gave each fabric ex-voto heart,
a silk ruffle
and studded these with austrian crystals!

They rest atop of an enclosed lace pocket
filled with lavender!
So long after these cookies are gone
the receiver will have a lovely
treasure pouch to place something inside! 

busy, busy, busy in Santa's workshop I tell ya'!!

I will be sharing these
beautiful white cookies
over at Kathleen's
for this weeks White Wednesday!

Come by for a visit and see what other pretties are there.

I hope so far, your holiday fa la la's have been happy!

~ see you soon! 


here's to edible sparkle powder and glitter stars!!

Dec 9, 2010

...fairy lights ~ a tutorial

hello my sweet's!!

I've been dancing around with the sugarplum fairies
sprinkling a little holiday magic here and there!

Today I will be sharing a tutorial on how to make these ~


I call them fairy lights!

Few supplies are needed to create these ethereal little light garlands!


~ and they truly are oh-so-lovely anywhere you plug them in at!

So grab your pen and pretty paper for your list of supplies
and let's get started:)
~
~ supplies ~


*a set ((or two!)) of these - 20 light strands
I like them because the wires are white and I can use this garland year round!!
  

*These are small bon-bon cups
((or mini candy cups, but I like the way bon-bon's sound better!!))
you don't need the whole bag of them...
unless you are making garlands for a party or wedding!!
I like to use these as they are more translucent than the
mini cupcake liners.
  

*pretty little flowers
you will need 1 per light so if your strand is a twenty lighter,
you will then need 20 flower heads!
I buy mine at the Dollar Tree,
and are just perfect for this project.
((yes, you can find pretty supplies there too!!))
they come 6 to a stem
and already have a soft vintage feel to them!!
You could even tea dye these if you wished.
But I like the creamy white color
so today that's what I will be using!

* you will also need your favorite glue gun and of course some glue sticks!

step 1:
take apart all the flowers you will need for your light strand
  

you won't need these sputnik centers,
but my kitty sure does like to bat them around!!
here kitty, kitty!!
Look what Sandy Clause brought you ~ LOL!! 
  

step 2:
cut through one side of the base of the flower bottom


like so


repeat for all flower bases.

step 3:
cut 3 small slits in the center of each petal


like this.
These you will be sliding over the lights.
repeat for all flower petals

step4:
take a hold of your light


slide the flower base bottom around the base of the light


place a dab of hot glue to secure in place


step 5:
put a dot of glue on the bottom already in place and slide one of your flower petals over the light
down to the flower base.


dot this petal with hot glue and slide down another petal.


step 6:
dot the petal with glue
only this time
push through one of the bon-bon wrappers down over the light


push it down until it meets the petals


step 7:
squeeze all petals ever so lightly while the glue is still warm
to shape your flower


I like to kinda twist the bon-bon wrapper around the light a little to resemble a stamen!


and viola!!
one fairy light done!
now repeat these steps again
until you have a whole glorious stand of

~ Fairy Lights!! ~ 


I hope you enjoyed this tutorial!

I am sharing this over at Debra's
where you will find more elves creative inspirations!!


here's to flower petals and a glue gun!