whisper your name


whisper your name on the things you find be~you~tiful . . .


Recent Posts

Showing posts with label an ozma of odds creation. Show all posts

Jul 9, 2014

a pretty pearl paper pajaki...


hello again dear hearts! 
my ~ 
but it has been a few days since my last posting!!

I hope your summer has been filled with many beautiful days
just full of happy activities 
as mine has been :)

last week, in a few spare moments
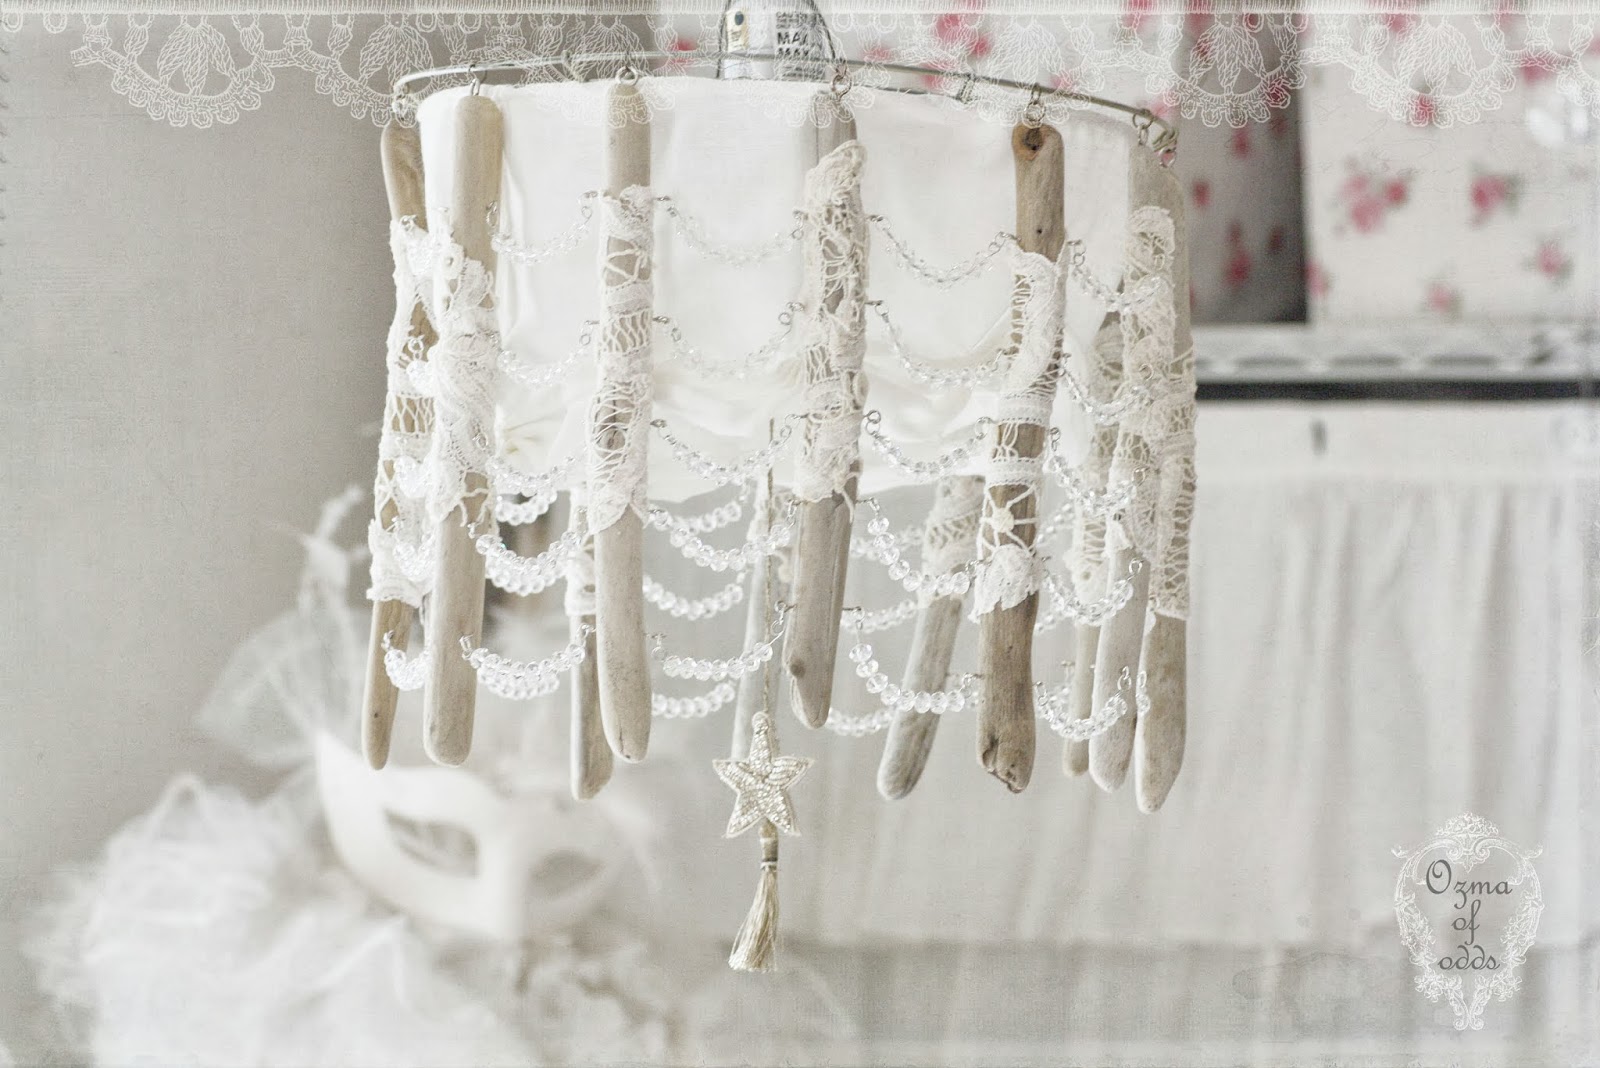
I created a pajaki...


Have you ever heard of them?!
Polish paper chandeliers??

well, 
I hadn't until I spied a most lovely one
over at Fete et Fleur's blog
I simply feel head over heels in love with the concept
and was inspired to make one too!

There are many "diy" tutorials on these
traditionally, they were made from straws and pieces of colored scrap paper
but I wished to make mine using pearl white paper
I don't believe that there is any one way to string them

simply gather up a few pretty paper things and have fun!


I used pearl tissue paper and made flower poms
 and paper punched circles out
of a pearl tissue sheet treated with wax paper
so when I sewed them together 
they would resemble illuminated capiz shells!


I looked for plain pearl straws
and would have even settled for plain white ones
 that I would have pearled myself
LOL!!

but,


I used these silver and white paper straws instead, 
incorporating tiny paper rose flowers between each straw section
for even more whimsy!


these pretty paper chandeliers could be used for parties ~
How lovely would a few strung over a food table be with a few twinkle lights?!!


or 
a baby mobile in a nursery?!?
I added a paper swan silhouette cutout
but you could use any shape you adore!


there are so many inspiring things in blog land!
and don't even get me started on pinterest!!

but how awesome is the ripple effect??
When we share the pretties we make for our homes
that bring a smile or a happy thought to our hearts 
that will perhaps in turn,
 inspire someone else's heart too!! 


I wish you all
 many lovely moments
living authentic, joyful days!


sharing this post with:
french country cottage's: feathered nest friday
shabby art boutique's: shabbilicious friday


here's to pretty paper pajaki's!

Oct 25, 2013

~ elegant tissue box cover tutorial ~

..."aahhh-choo"...

*bless you*

as you reach for a tissue
in a pretty cardboard box...

NOT!

seriously

~ i ask you ~

WHY
has no one 
started printing pretty cardboard tissue boxes?!

perhaps a neutral french script or a fluer-de-lis design would be nice
( i bet a pair of fairy wings
that THOSE tissue box sales would increase!! )

and i am certain that there are a few out there
that this really won't matter to
but 
if the ugly tissue box quandary has stymied you ~
be stymied no more!!


for here is a tutorial
to make a FULL SIZE tissue box cover
in whatever color/pattern you choose!

cause the holidays are comin'
and details matter!!

shall we begin?!?


supply list: 
* a blank wooden tissue box 
 can be found at your craft store
* a can of your favorite color spray paint
mine choice was Krylon's Sterling Silver
* pretty paper napkins
you will need 4 small cocktail napkins for this project
* mod podge matte 
* a small paint/sponge brush
* rhinestone blingage
or other embellishment that you desire
or, none at all!


step one: lightly spray your wooden box.
i have chosen to spray paint my box
 rather than to paint it
because, 
i desired a slightly luminous quality
that would appear from under the paper napkin.
that could only be achieved with the spray paint
and if sprayed lightly, is translucent.


step two: open your paper napkin 
and lay it over your box
 until you are pleased with the design placement.
( don't cut anything yet, you will do that later )
 i have chosen to use a paper napkin
 as opposed to a piece of paper
because it is easier to apply
 and
 it attaches itself in a way that melds with the actual box
 as opposed to laying on top of the box.
and hello!
tissue
as in, a tissue box!!
lol!!


step three: separate the napkin layers,
for you want to see the slight color underneath silly!!


if your napkin was not double ply, simply skip this step!


step four: start on one side,
and brush on a nice, smooth coat of mod podge matte medium


~ smooth coat ~


then lay your tissue layer
 on the mod podge coated side.


very CAREFULLY smooth the tissue layer
almost patting it lightly with the pads of your fingers
to adhere it to the mod podge.
fold excess underneath the box for now.


now, simply flip the box over and repeat the previous steps.


when you get to the box ends,
and BEFORE you coat with it mod podge,
 lay out the placement of your tissue layer
and trim the sides a little larger than what meets to the edge.
this will allow for a clean edge.
don't trim the tops.
you will find that all the paper napkin points will meet at the top
and should line up and touch when folded over.
mod podge the tissue points at the top of the box first
 folding them towards the center "tissue opening"
fold excess underneath to the inside of the box
and attach with the mod podge.


then mod podge the short sides.

when you get to the bottom of your box,
trim the excess tissue paper to about a 1/2 inch all the way around.
mod podge the bottom lip and about 1/2 inch inside
then gently smooth the tissue over.


step five: when all the sides are covered in the tissue paper,
lightly brush the entire box with a coat of the mod podge.
this will give the paper a protective layer.


step six: add your embellishments, if any.
i used two rows of sticky back rhinestones 
around the top of my tissue box
for a little sparkly bling!


add an actual box of tissues
 and voila!!
you will have yourself one lovely tissue box cover


and the next time you reach for that tissue
you'll be thinking
"aahhh~pretty tissues"
as you sneeze!!

lol!!


sharing this post with:
petite michelle louise's: grey dey thursdey
common ground's: be inspired friday
french country cottage's: feathered nest friday
my romantic home's: show and tell friday


here's to pretty little details!

Oct 3, 2013

...fairytale sea-pumpkins...

aaahhhhh...
autumn at sea ~
when the days start to turn on the crispy side,
and the sun wanes earlier,
my thoughts wander even more
to the beautiful sea.
the word
~ resplendent ~
comes to mind
and
captures my emotion brilliantly!
as my home continues to be spun into
  an elegant seaside style
with a twist of simplicity of the french-nordic style
i find myself creating pieces that i adore
colors, textures ~ magic!


my latest collection simply being
~ fairytale sea-pumpkins ~
i crave materials that are ethereal to the touch
and appealing to my eye
i delight in a mound of the like,
just waiting to be spun into loveliness!

sumptuous silk velvet,
hand dyed in shades of the ocean side
along with gorgeous dupioni silks
made into the most lovely ribbons you could imagine
so much so,
if i have a choice,
i will only use them in my created pieces...
and oh my!
the exquisite beaded lace!


beauty is,
as beauty does
and don't let anyone ever tell you that the inside doesn't matter!!
'cause in a fairytale pumpkin ~
IT DOES!!
luxury filling with a touch of silk,
a sweet kiss of organic lavender,
tucked within a sachet
lie below the beautiful velvet that you see...
rendering a luxury fabric pumpkin
that will delight one for years to come...


bringing with it, a love of beautiful sea ~


~i surrender~
LOL!!

i have been making these pretty fairytale pumpkins for years
and their shades always surprise me...
the few that i have shown you here
are the grey shades.
sharing this post with:
petitemichellelouise's: grey dey thursdey
common ground's: be inspired friday
french country cottage's: feathered nest friday
my romantic home's: show and tell friday

and next time,
i'll be sharing with you ~
this fabulous leather sea lace bag...
until then,
sea whishes of autumn joy...
...here's to everyday fairytales!

Sep 19, 2013

...an enchanted driftwood chandelier

 
hello my sweets!
 
do you ever find yourself seeking something,
that you can't quite put your finger on?
 
you just know that when you see it ~
 
you.  will.  know.
 
well!
this is the story
of just such an item
 ...
and how it came to be :)


a few ~ l o n g ~ weeks ago
i set out on a quest
to find a chandelier for my studio table.
 
not just ANY chandelier
 
THE chandelier!
 
an enchanting chandelier that would illuminate my pretties
as i created them...
and delight my heart to turn it on.
 
for my studio IS a magical place...


in those weeks of my quest,
i would find something that i thought "might" work,
bring it home ~
 
hold it up
 
and hold my breath!
 
 
yah no!!
 
notta
 
and
 
NO!
 
was usually the response from my lips...
 
i felt like Goldilocks, i tell ya!


i had grown weary of looking
 
until one day, while creating at my studio table
a light bulb went on,
so to speak
 
LOL!!
 
and these photo's are the result of that epiphany that day...


yep!
as you may have already guessed
i ended up designing,
 what my heart was seeking...
 
which is what i should have done to begin with!!


a few lace covered pieces of perfectly greyed driftwood,
a hand gathered white linen shade,
crystal swags that dance when the sun hits them or the light is lit...
all spun into one enchanting chandelier!
 
 
sigh...


another sea washed treasure,
to adorn my cottage...


this is my studio table...
it is ever so magical when i plug in my fairy lights around the table
and my enchanted driftwood chandelier!
 
most especially as the days start to grow shorter...


i know it will provide much more than just light
in the coming months ahead,
as i sit beneath it
 and create away...


for it will also allow me to be swept away
and dream
if only for a moment or two...
on such things as the beautiful sea


and pondering on other fairytale delights,
to share with all of you!!


like, perhaps this sea silk rhinestone cuff ...


i hope you enjoyed your visit today!
thanks for stopping by...
 
 
sharing this post with:
 
petitemichellelouise's: grey dey thursdey
common ground's: be inspired friday
french country cottage's: feathered nest friday
my romantic home's: show and tell friday


...here's to enchanting lighting!
 

LinkWithin

Related Posts with Thumbnails