I hope your weekend was full of happy moments :)
~
I thought today
I'd share a tutorial!
of a Wonderland Rose ~
You can make these in any color of dye you can get your hands on!
I just chose a blue for Alice in Wonderland.
Here is a list of the supplies you will need:
* rit dye, tea, coffee, easter egg dye
* a pair of rubber gloves
* coffee filters
* rose petals
* tulle circles or lace
* flat head brads
* glue (I like Martha's glitter glue, it sets up a little quicker than elmers)
* an image for the center of your rose
* scissors
Before you begin, you will need to dye your coffee filters and rose petals.
Here are a few tricks I have learned along the way ~
Rose petals ~ collect these whenever and wherever you see them!
I never pass roses up and have found them anywhere
from Michaels Craft Store,
to the Dollar Store and everywhere inbetween!
You will need to take them all apart! You only need the petals.
Coffee filters ~ you can use white ones or the natural
Dye ~ any listed above, you are only limited by your imagination!
Think outside of the box.
To Hand Dye:
everyone has their method, this is mine ~
#1 ~ Where an old apron or your paint clothes!!!
#2 ~ Preheat your oven to a low temp, I set mine at 240 degrees.
I use a large enamel pot and fill it about 1/2 full,
then I put in my dye "of the moment" and GENTLY stir.
Your are only dying petals and filters, not yourself!
#3 ~ Heat your dye bath until hot, but not boiling.
(You're not trying to scare your petals and filters!)
I find that the filters and petals take the dye better this way, rather than in cold water.
But experiment!
#4 ~ Take a stack of filters and put in pot until color soaks thru.
#5 ~ With your rubber gloves on, remove the stack of filters and gently squeeze excess dye out.
Place on a baking sheet that you have lined with parchment.
(don't use your silpats, some of the dyes stain them!)
#6 ~ Place in warm oven until dry.
This will depend on how thick your stack is,
I usually will dye a stack of 50 together and then just put about 15 in a pile to dry.
You do not have to worry about seperating them.
As they dry, they will just seperate themselves.
Check them every 15 minutes or so and turn the pile over.
(when it is summer, and really hot out, you can put them outside to dry)
#7~ rose petals, repeat steps #4 - #6
When all that is dry, we can assemble the wonderland roses!
Take a few of your dyed coffee filters and fold in half
then fold again into 1/4ths, so your stack looks like this:
next, cut your "petals" out
Be sure to leave some folded sides uncut, as this is what keeps them attached to each other!
remember making snowflake in grade school??!!!
Repeat these steps with your tulle or lace.
(you can make it easier on yourself if you purchase
the tulle already cut in circles)
Now the assembling part begins,
take a rose petal layer
and then add a tulle or lace petal.
stagger the layers as you go
next, take a coffee filter layer and crumple it up in your hand.
uncrumple, and place on your tulle layer
next, a tulle layer
then, a petal layer
remember to stagger as you go, add as many layers as you like
when you are pleased with the fullness of your rose,
it's time for the center!
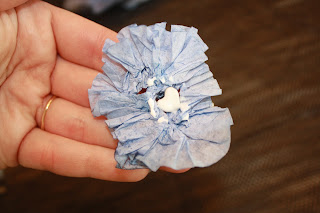
take the leftover cutout part from your filter petals
and ruffle it into a circle, pinching and squeezing as you go
add some glue, and squeeze and pinch some more!
(I know~ it feels like we are still back in grade school again, doesn't it?!)
yours should look something like this
now push the flat head brad into the center
(just the paper, not your finger...
oh snap ~ I didn't have you sign a waver form, did I?!
well, just for the record, pleeeaaase be careful with pointy, sharp things, ok?!)
add some more glue
and then your choice of center
fluff until it pleases you ~
Now use the brad like a needle and start putting all your layers on
one at a time.When you get to the last layer, open the brad tines out onto the last layer.
This is where you could glue on a pin back and then cover that with a small, single petal.
Ta Da! ~ a completed wonderland rose!
I hope you enjoyed this tutorial!
If you did, please let me know and maybe I will do more in the future.
Have fun making Your own version of
...a wonderland rose!


Beautiful! Thanks for sharing!
ReplyDeleteDebby
So pretty!!! Thanks so much for sharing... Have a blessed day!
ReplyDeleteDaphne
Wonderful tutorial! So very sweet~
ReplyDeleteThank you for sharing~
Michelle
I could have used this tutorial when my friend's daughter and I were working on her art project. I will keep this for her and I. Incredible pictures!
ReplyDeleteWonderful!!! xo
ReplyDeleteI'm so making these. Beautiful!!
ReplyDeleteTammy